Asset Configuration and Automatic Asset
Creation through Vendor Bills in Odoo 19
Introduction
Managing fixed assets manually becomes increasingly challenging as a business grows. Businesses need to accurately record, capitalize, and depreciate purchases of equipment, machinery, vehicles, computers, and furniture throughout their useful life. Odoo 19 simplifies this process by helping organizations configure fixed assets, create reusable Asset Models, and automate asset creation through Vendor Bills.
Odoo 19 streamlines fixed asset management with an integrated Assets module. Businesses can configure Asset Models, capitalize purchases through Vendor Bills, automatically generate asset records, and manage the entire asset lifecycle—from purchase to depreciation—all within a single system.
In this blog, we will walk through the complete configuration required for fixed assets, followed by the process of capitalizing assets through vendor bills and automatically generating asset records in Odoo 19.
What is Asset Capitalization?
Asset capitalization is the process of recording the cost of a long-term asset on the Balance Sheet instead of recognizing the entire purchase cost as an expense immediately. Rather than expensing the asset upfront, businesses spread its cost over its useful life through depreciation, ensuring more accurate financial reporting.
In Odoo, posting a Vendor Bill capitalizes the asset purchase by recording it in the configured Fixed Asset Account. Based on the automation settings, Odoo can also create the corresponding asset record simultaneously. When you enable the Create in Draft option, Odoo creates the asset in the Draft state, giving users the flexibility to review the asset, configure the depreciation settings, and validate it before generating the depreciation schedule.
Asset Configuration in Odoo 19
Before you enable automatic asset creation through Vendor Bills, configure the required accounting settings in Odoo.
The system allows you to configure each asset individually by specifying its accounting information, depreciation settings, journal, and other required details directly on the asset record. This approach works well when you manage only a few assets or when each asset requires a unique configuration.
However, when multiple assets share the same accounting treatment, configuring each one separately becomes repetitive. In such cases, Odoo provides Asset Models, which act as reusable templates for similar assets.
An Asset Model acts as a reusable template for assets with similar accounting and depreciation settings. Instead of configuring each asset individually, you can define these settings once in the Asset Model and apply them whenever you create a new asset of the same type.
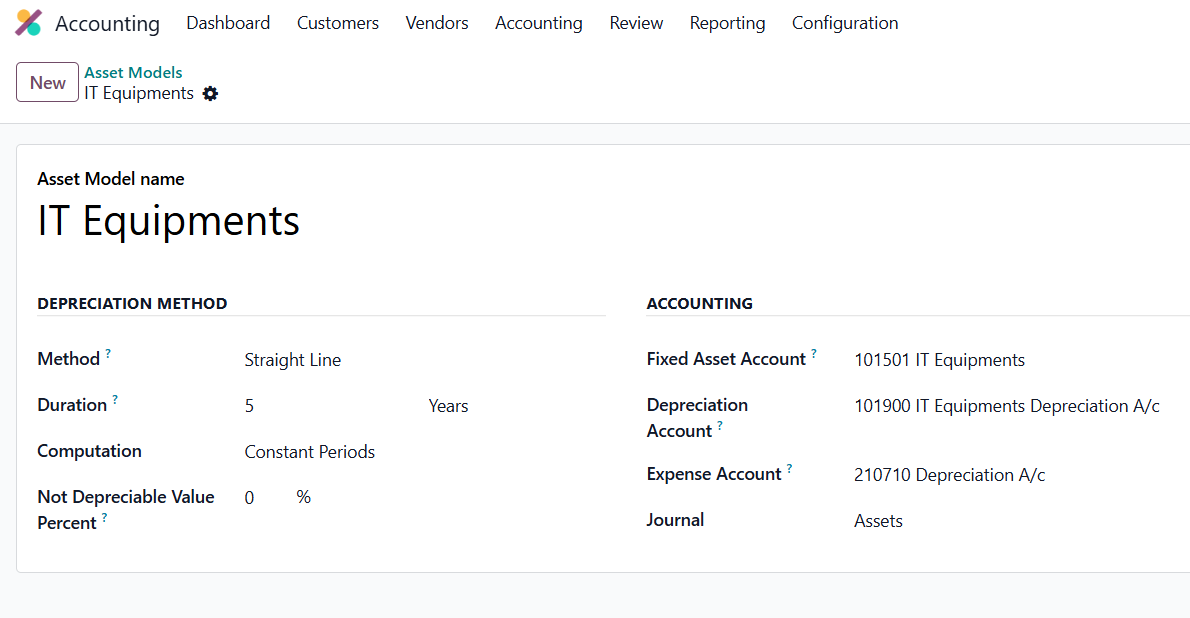
Example: For this demonstration, we’ll create an IT Equipment Asset Model and use it for assets such as laptops, desktop computers, printers, monitors, and other electronic devices with similar accounting and depreciation settings.
To create an Asset Model, navigate to Accounting → Configuration → Asset Models, then click New.
Enter an appropriate name for the Asset Model. In this example, we’ll create an Asset Model named IT Equipment, which can be assigned to assets such as laptops, desktop computers, printers, and monitors. Since these assets typically follow the same accounting and depreciation rules, defining a common Asset Model eliminates the need to configure each asset individually.
Configuring the Required Accounts
Before creating an Asset Model, ensure that the required accounting accounts have been configured in the Chart of Accounts.
Note: If you do not see the Fixed Asset Account field while configuring the Asset Model, enable Developer Mode by navigating to Settings and activating Developer Mode. Once enabled, the field will become visible.
The following accounts should be configured:
- Fixed Asset Account: Create an account with the Fixed Assets account type and assign it as the Fixed Asset Account. This account records the acquisition cost of the asset and represents its value on the Balance Sheet.
- Accumulated Depreciation Account: Create an account with the Fixed Assets account type to record the total depreciation accumulated over the asset’s useful life. This account reduces the carrying value of the asset on the Balance Sheet while preserving its original cost.
- Depreciation Expense Account: Create an account with the Depreciation account type and assign it as the Expense Account. Each depreciation entry generated by Odoo is posted to this account, allowing depreciation expenses to be reflected in the Profit and Loss statement.
It is recommended to create a dedicated Assets Journal with the Miscellaneous journal type. This helps keep all asset-related journal entries organized and makes them easier to review and track separately from other accounting transactions.
Once you create an Asset Model, you can reuse its accounting and depreciation settings for similar assets. You only need to enter the details unique to each asset, such as the Asset Name, Original Value, and Acquisition Date.
Note: Creating an Asset Model is optional in Odoo 19. Assets can be created manually by configuring all the required accounting details individually. However, Asset Models are considered a best practice for organizations managing multiple assets with similar accounting configurations, as they improve consistency, reduce manual effort, and minimize configuration errors.
Automatic Asset Creation through Vendor Bills
Once the required Asset Model or Fixed Asset configuration has been completed, Odoo can automatically generate assets from Vendor Bills.
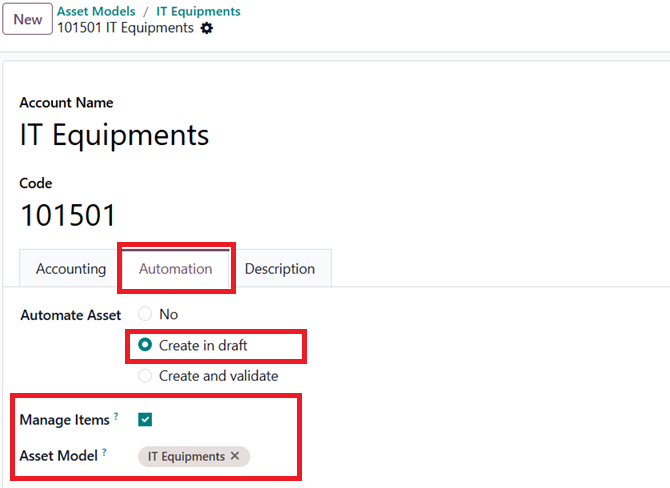
Navigate to the Automation tab of the Asset Model (or the individual asset configuration). Here, Odoo provides two options for automating asset creation:
- Create in Draft: Enable this option to let Odoo create the asset in the Draft state when you post the Vendor Bill. You can then review the asset, configure the depreciation settings, and validate it before generating the depreciation schedule.
- Create and Validate: Enable this option to let Odoo create and validate the asset automatically when you post the Vendor Bill. This option works best for organizations that use standardized asset configurations and do not require manual review before depreciation begins.
Enable Manage Items to create an individual asset record for each purchased item.
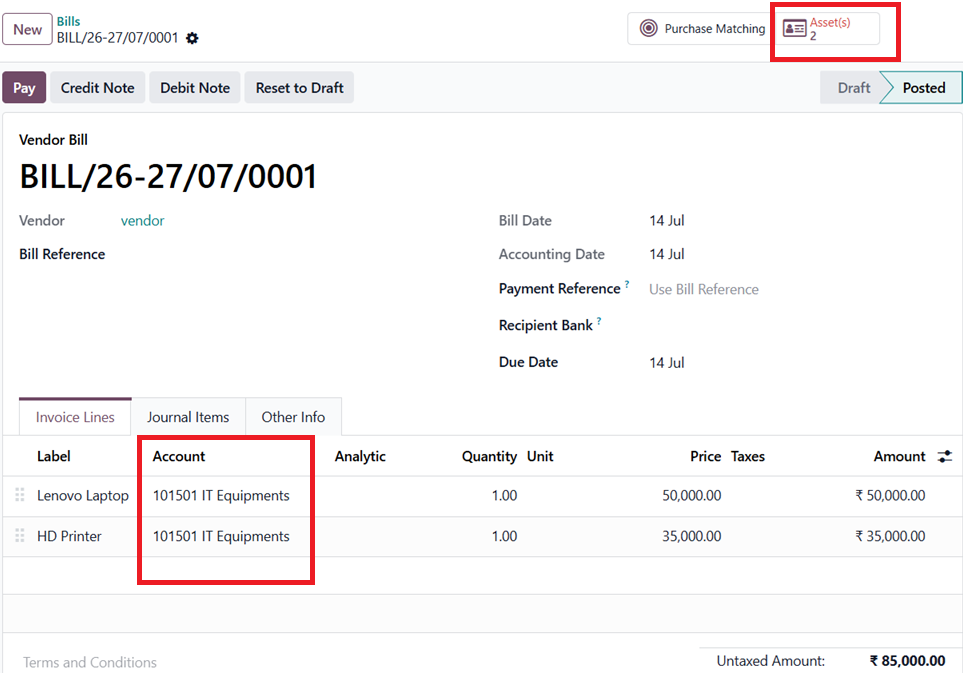
Next, create a Vendor Bill for the asset purchase. While adding the bill line, ensure that the Account selected is the corresponding Fixed Asset Account configured for that asset or Asset Model.
Post the Vendor Bill to trigger automatic asset creation based on the selected automation option. You can then access the newly created asset using the Asset smart button on the Vendor Bill.
If you choose the Create in Draft option, review the asset details, configure the depreciation method and duration, and update any other required settings before validating the asset.
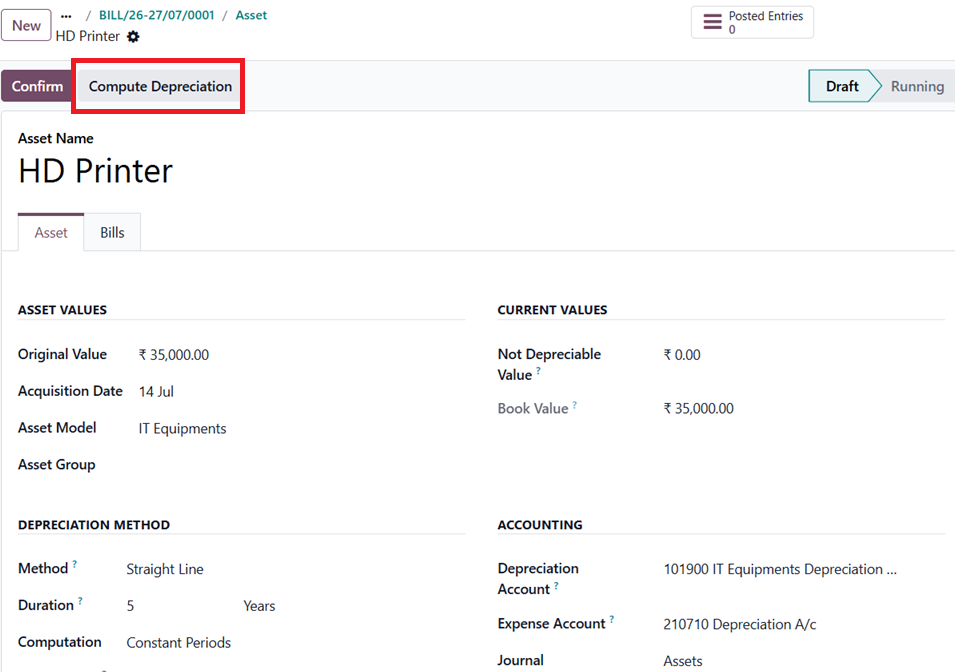
Once the information has been verified, validate the asset and click Compute Depreciation to generate the depreciation schedule. If the schedule is fine, then click on confirm.
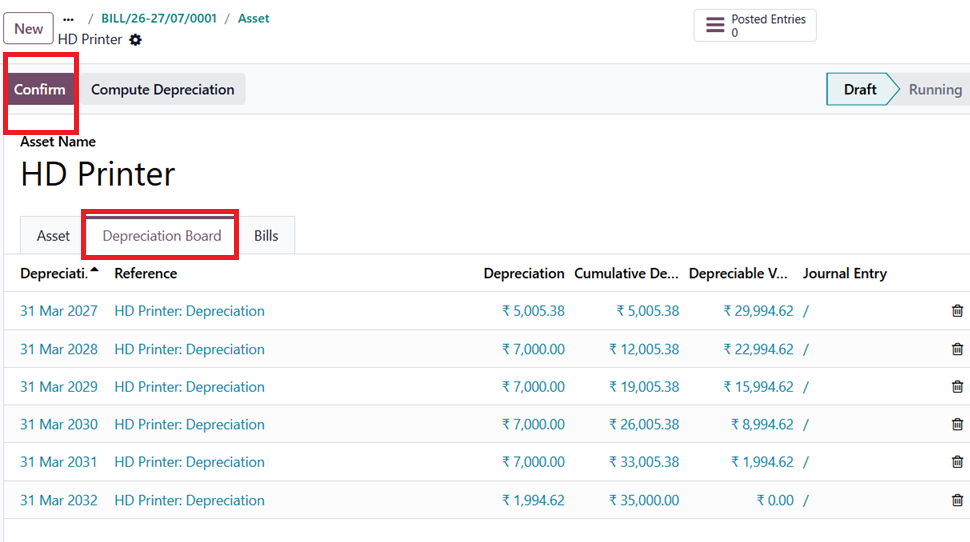
Odoo then generates future-dated depreciation journal entries according to the configured schedule. Odoo automatically posts depreciation journal entries on their scheduled dates.
Conclusion
Efficient fixed asset management begins with the right configuration. Whether you configure assets individually or use Asset Models, Odoo 19 lets you choose the approach that best suits your business.
For organizations managing multiple assets, Asset Models reduce repetitive configuration, while Vendor Bill integration automates asset creation and capitalization.
Looking to streamline your fixed asset management in Odoo 19? Partner with Infintor Solutions to implement a tailored Odoo solution that automates asset creation, simplifies depreciation management, and improves accounting accuracy.