How to Create and Manage Rental Products and
Rental Requests in Odoo 17 CRM?
Renting can be a way to generate revenue without relying solely on product sales. It can also be a means of utilizing existing inventory more efficiently. It provides an opportunity for businesses to showcase the quality and features of their products, potentially leading to future sales. Businesses that deal with products that quickly depreciate may find renting a more sustainable model than selling. Besides, Renting allows customers to access and use products without the upfront costs associated with purchasing. This can be especially beneficial for expensive items or those that are only needed temporarily.
Customer relationship management and rental management may exchange data and procedures easily when CRM is integrated with the Rental module in Odoo 17. You can offer a more effective and client-focused experience, from lead generation to rental order fulfillment, while keeping a thorough record of customer interactions and rental transactions by integrating CRM with Odoo’s Rental module.

In this blog, we can discuss in detail how to create a rental product, how to create a rental request form to be submitted by customers, how to manage rental requests, and how to create a new rental order, as this is the usual workflow of managing rental in Odoo. Firstly, we can create rental products in Odoo to specify the products that the company would like to be given for rent.
Creating a Rental Product
Rental Application => Products Menu => New

For the rental item, you can make a new product record by clicking the New button. Choose “Can be Rented” as the product category while filling out the product form. This will enable renting of the product.
In the Rental Product form, we need to give details such as Product name, Product type (Consumable, storable, or service), Invoicing Policy, Unit of measure, Purchase unit of measure, Sales price, Customer taxes, cost, product category, Internal reference and other relevant details in the ‘General Information’ tab. In the ‘Product Category’ field, we need to select ‘All/Rental’ from the drop-down as the product belongs to the Rental category.
In the ‘Attributes and Variants’ tab, you can specify the different variants of the rental product that you are offering.
Set up the rental product’s settings of sales. This includes establishing the optional and alternative products, e-commerce website, and POS for the product in the ‘Sales’ tab.
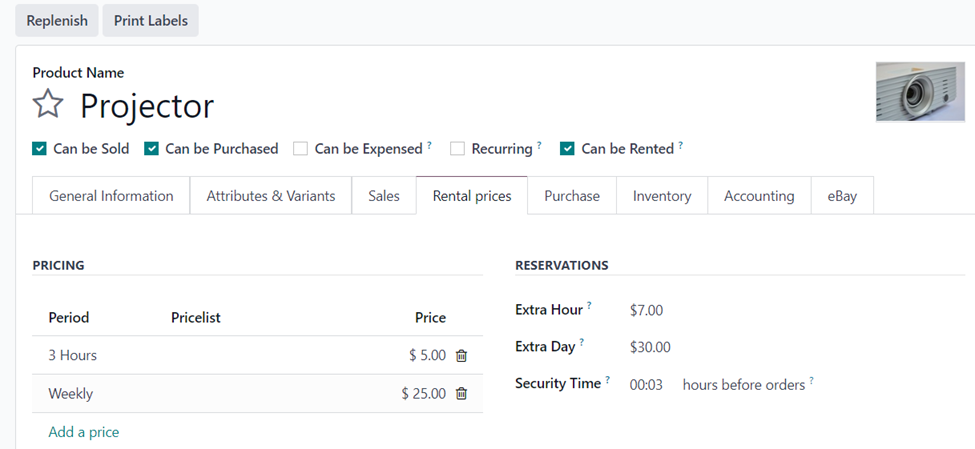
You can specify the rental product prices in the ‘Rental prices’ tab.
When you go to the ‘Purchase’ tab, you can add the vendor from which the rental product is purchased and specify the vendor tax and control policy.
The ‘Inventory’ tab is where we need to specify the operation routes, Responsible person, Customer lead time, Volume, Weight, and so on.
You can specify all the accounts associated with the rental product such as Income account, Expense account, Price Difference account, Account tags, and other details in the ‘Accounting’ tab of the form.
We also have the option to sell the rental product on eBay by going to the ‘eBay’ tab.
After specifying the necessary details in the form, click on the ‘Save’ button. The rental product can be used in rental orders, quotations, and other relevant transactions when it has been configured in Odoo. To handle rental inquiries and orders more efficiently, you can easily combine it with other modules including your CRM.
Now Suppose, that a customer submits a rental request by filling enquiry form on the ‘Contact Us’ page of the company website.

Since the CRM application is integrated with the Rental module in Odoo, a new lead with the Subject name is generated in the Odoo CRM after a customer submits a rental inquiry in the contact form of the website.

To get more details about the lead and their request, open the respective lead created for the rental request.

The details filled up by the customer in the contact form of the website are automatically updated in their corresponding fields. If you want to add more details, go to the required tab to fill up the necessary information. From the lead generated in the CRM as seen in the above example, you can create a rental order.
Creating a Rental Order from Odoo CRM
Select the ‘New Rental’ button to create a rental order for the rental request received from the customer.

We can see the above page with all the necessary details such as customer, expiration, rental period, and so on entered. Here, you need to add the rental product to the order by clicking on either the ‘Add a product’ or ‘Catalog’ option and selecting the rental product.

After confirming the rental order created, we can follow the usual steps of processing an order.
Create Invoice > Select Invoice type > Confirm the draft Invoice >Register Payment > Create Payment >In Payment.
You can offer a more effective and client-focused experience, from lead generation to rental order fulfillment, while keeping a thorough record of customer interactions and rental transactions by integrating CRM with Odoo’s Rental module. Experts from Infintor Solutions are always there to help you out in the process of managing all your business activities through our innovative solutions in Odoo.